Every time you sit down for a fresh manicure or prepare your own hands for a new set of extensions, there is a hidden risk lurking right on the manicurist’s desk. The very tools designed to smooth, prep, and perfect the nail plate often harbor microscopically sharp borders capable of slicing through delicate skin in a fraction of a second. This seasonal surge in dry, cracked winter cuticles only amplifies the danger, turning a routine beauty treatment into a painful ordeal that takes days to heal and risks severe bacterial infections.
Yet, elite professionals possess a counterintuitive secret to guarantee a completely pain-free experience. Before they even touch a client’s hands, they engage in a deliberate, almost destructive act of physical modification. By intentionally damaging a brand new professional tool right out of the wrapper, they neutralize a threat most people do not even know exists, transforming a harsh abrasive into a perfectly safe smoothing instrument.
The Hidden Danger of Factory-Fresh Tools
When manufacturers produce Nail Buffers and files, the abrasive paper is glued to a central foam or plastic core and then die-cut in massive sheets. This high-pressure stamping process leaves behind a razor-sharp edge of compressed grit and adhesive. When a manicurist aggressively files near the perionychium—the skin surrounding the nail—these microscopic blades can instantly slice the skin. Experts advise that relying on a factory-fresh edge without prior modification is the leading cause of salon-induced micro-lacerations. To accurately identify the root causes of manicure discomfort, clinical dermatology studies confirm the importance of diagnosing the specific mechanical failures of nail tools.
- Symptom: Sudden, sharp stinging near the cuticle bed during the initial prep phase. Cause: An unscored, factory-sharp abrasive edge slicing the delicate eponychium.
- Symptom: Redness and prolonged inflammation along the lateral nail folds 24 hours post-manicure. Cause: Repeated friction burns from stiff, unmodified sponge cores lacking edge flexibility.
- Symptom: Jagged, peeling skin on the fingertips after an acrylic fill. Cause: Using a harsh 100-grit edge against the fragile stratum corneum instead of isolating the grit strictly to the hard keratin of the nail plate.
Understanding the exact mechanics of this incidental skin damage is the first critical step toward mastering the protective physical modification.
The Physical Modification: Why Experts Destroy Before They Create
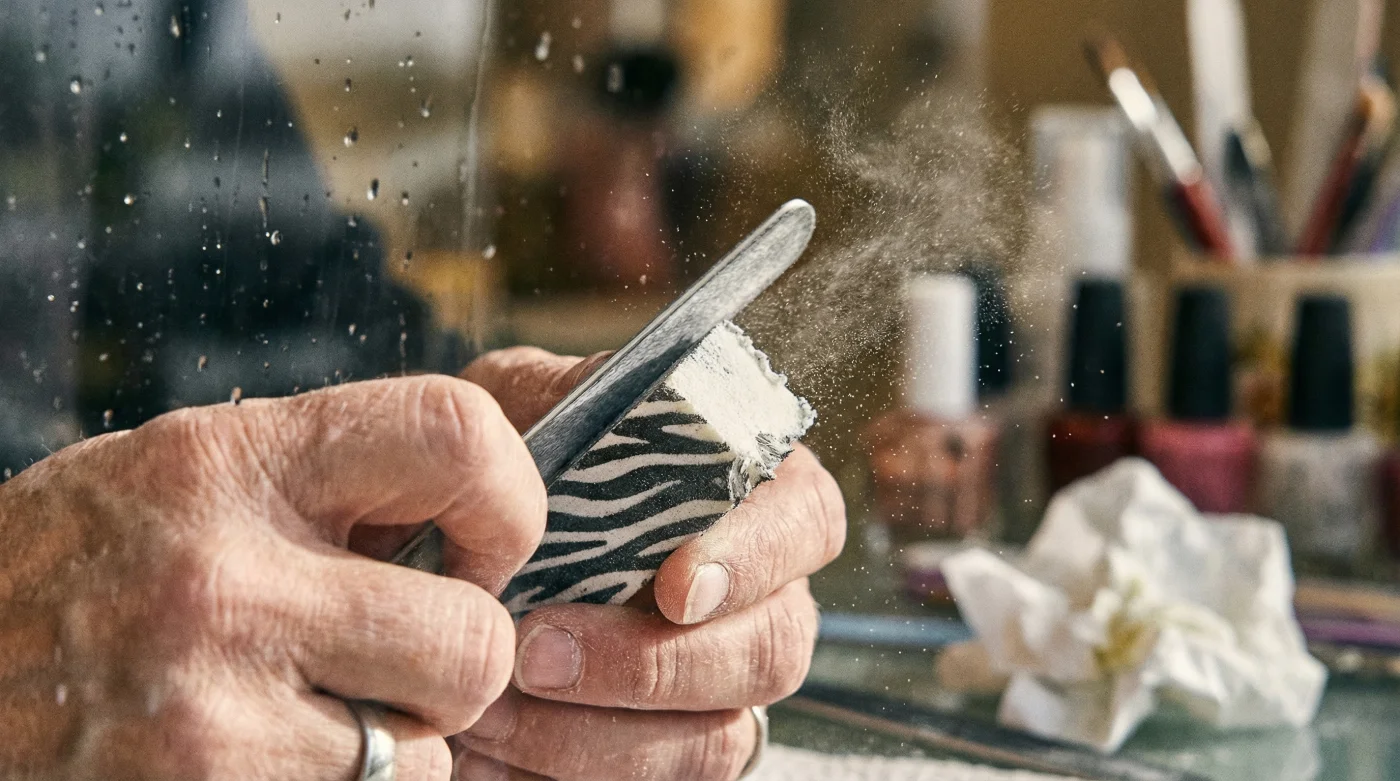
The technique known as scoring the edges involves taking an older, seasoned file and grinding it directly against the sharp perimeter of fresh Nail Buffers. Friction reveals a deliberate act of damaging a brand new professional tool before use, effectively blunting the microscopic overhang of aluminum oxide or silicon carbide crystals. By applying this specific technique of grinding down sharp paper edges, you stop accidental client bleeding before the service even begins. This ensures the abrasive surface only contacts the nail plate, allowing the buffered edge to glide harmlessly over soft tissue without catching or tearing.
| Target Demographic | Primary Vulnerability | Scoring Modification Benefit |
|---|---|---|
| Mature Clients (50+) | Thinning epidermis and reduced skin elasticity | Prevents deep tissue bruising and severe lacerations from stiff cores |
| Chronic Nail Biters | Exposed, highly sensitive hyponychium | Allows aggressive prep work without triggering severe pain responses |
| Winter Salon Visitors | Severely dehydrated, micro-cracked cuticles | Glides over existing micro-tears without exacerbating the damage |
To fully grasp why this physical modification is universally non-negotiable, one must dive deep into the structural physics and scientific data of modern abrasives.
The Science of Abrasives and Skin Integrity
- CND Shellac completely removes toxic plasticizers from their entire professional line
- Purell hand sanitizer daily application slowly dissolves expensive gel polish top coats
- Diluted tea tree oil entirely prevents lifting beneath heavy builder gels
- Standard rubbing alcohol strips sticky gel residue exactly like expensive salon cleansers
- Formaldehyde based nail strengtheners completely shatter dry peeling plates over time
| Grit Rating | Edge Sharpness Factor | Recommended Scoring Dosing |
|---|---|---|
| 100 Grit (Coarse) | Extreme (Micro-blade level) | 5 to 6 heavy friction swipes with a seasoned file |
| 180 Grit (Medium) | High (Paper-cut level) | 3 to 4 moderate friction swipes with a seasoned file |
| 240 Grit (Fine) | Moderate (Friction burn risk) | 2 light friction swipes to round the adhesive border |
Armed with the precise scientific data of abrasive forces, you can now implement the exact dosing and technique required to neutralize these hazards.
Step-by-Step Execution: The Perfect Scoring Technique
Proper execution of this safety protocol requires precise angles and measured force to ensure the integrity of the tool is maintained while the danger is eliminated.
Step 1: The 45-Degree Angle Approach
Hold your fresh Nail Buffers firmly in your non-dominant hand. Take a seasoned, slightly worn 180-grit file in your dominant hand. Position the seasoned file at exactly a 45-degree angle against the harsh 90-degree factory edge of the new buffer. This specific geometric positioning ensures you are actively beveling the edge rather than simply flattening and ruining the core.
Step 2: The Two-Pound Pressure Rule
Apply approximately 2 pounds of downward pressure. You should feel a distinct mechanical resistance but not enough force to bend the core of either tool. Swipe the seasoned file down the entire length of the fresh buffer’s edge in one continuous, fluid motion. Do not use a sawing back-and-forth motion, as this introduces multi-directional stress that can cause the abrasive paper to prematurely delaminate from the foam core.
Step 3: The Precision Dosing Protocol
Execute exactly 3 to 4 full-length swipes per edge for a standard 180-grit buffer. This specific dosing of friction is critical. Too few swipes will leave dangerous micro-burrs intact, while over-scoring can strip the grit entirely and compromise the working surface of the buffer itself. Run your thumb gently along the modified border to verify the stratum corneum safety check; it should feel entirely smooth and velvety to the touch.
Once this precise scoring technique becomes ingrained muscle memory, the final step is ensuring you are consistently investing in the right foundational tools.
Evaluating Your Arsenal: Not All Abrasives Are Created Equal
Even with flawless scoring techniques, the structural quality of your Nail Buffers ultimately dictates the safety of the manicure. Cheaply manufactured tools often utilize brittle cyanoacrylate-based adhesives that shatter during the scoring process, creating secondary jagged edges that are even more dangerous. Elite professionals prioritize files constructed with flexible, medical-grade foam cores and reinforced Japanese paper backing. These premium materials respond predictably to physical modification, yielding a perfectly rounded, safe edge that protects the delicate lateral folds.
| Buffer Component | Professional Standard (Look For) | Red Flag (Avoid) |
|---|---|---|
| Abrasive Material | Premium Silicon Carbide or Aluminum Oxide | Unlabeled generic sand grit that sheds upon contact |
| Core Construction | Medical-grade EVA foam with high flexibility | Rigid, brittle plastic centers that cannot absorb shock |
| Adhesive Type | Resin-over-resin bonding agents | Cheap cyanoacrylate glues that crack when scored |
Integrating these high-quality tools with rigorous edge modification will permanently elevate your technique, ensuring every future manicure session remains utterly flawless, technically sound, and completely pain-free.