There is a silent, stinging menace lurking inside every fresh package of nail care tools, waiting to sabotage your pristine DIY manicure. You sit down, unwrap a brand-new file, and begin shaping your nails, only to be jolted by a sharp, paper-cut-like slice along the delicate skin of your nail bed. Most people wrongly assume that a factory-fresh tool is the safest and most optimal choice right out of the wrapper, but top-tier manicurists know this common misconception leads to persistent inflammation, bacterial entry points, and incredibly painful micro-cuts that take days to heal. The assumption that new means perfect is the exact reason why so many at-home beauty routines end in localized trauma and intense frustration.
The hidden culprit is not your filing technique, the speed of your strokes, or even the angle of your grip, but rather the raw, razor-sharp factory edge of the file itself. There is a specific, ten-second physical modification—a hidden habit practiced exclusively by elite nail technicians—that completely neutralizes this invisible threat. By understanding the mechanical dynamics of this commonplace tool and applying a simple structural adjustment before you ever touch your hands, you can permanently eliminate the risk of accidental sidewall skin tearing and achieve flawless, salon-grade results without the collateral damage.
The Anatomy of a Sidewall Slice and Dermal Vulnerability
Experts advise that the lateral nail fold, scientifically known as the perionychium, is an incredibly delicate anatomical structure that is highly vulnerable to abrasive friction. The skin of the lateral fold is often less than 1.5 millimeters thick, making it highly susceptible to mechanical shearing. When manufacturing facilities produce standard emery boards, they glue massive sheets of abrasive grit to a cardboard or high-density foam core. Heavy industrial machines then die-cut these sheets into the familiar elongated oval shapes. This violent stamping process leaves a perpendicular wall of jagged, unbuffered crystals along the absolute perimeter of the board. When you aggressively saw back and forth to shape your natural nail, these microscopic serrations act like a miniature, unyielding hacksaw directly against the stratum corneum of your fingers. Friction from rapid filing can even generate localized heat spikes up to 115 degrees Fahrenheit, which severely exacerbates the tissue damage.
Diagnostic Troubleshooting: The Friction Factor
Understanding exactly how this damage manifests can help you correct your technique before a serious bacterial infection sets in. Here is a critical diagnostic breakdown of common issues:
- Symptom: Localized redness, throbbing, and swelling along the lateral nail fold. Cause: Excessive, sustained friction from a 100-grit unbuffered edge creating a thermal micro-burn on the skin.
- Symptom: Tiny, stinging paper cuts right at the corner where the nail meets the cuticle. Cause: Using freshly unwrapped nail files without dulling the perimeter, allowing the 90-degree factory edge to slice the soft tissue.
- Symptom: Jagged, peeling, or hardened skin appearing 48 hours after a fresh manicure. Cause: Invisible micro-lacerations from abrasive overhang that compromised the skin moisture barrier, leading to rapid, unnatural cellular desquamation.
To stop this localized trauma before the first microscopic cut even occurs, we must look at how different individuals benefit from an adjusted and highly personalized filing protocol.
Targeting Your Unique Dermal Profile
Not all hands endure the rigors of cosmetic maintenance in the exact same way. Depending on your weekly routine, the thickness of your dermal layers, and the type of nail enhancements you prefer, the underlying danger of an unmodified file varies wildly. Studies confirm that tailoring your tool preparation to your specific anatomical needs drastically reduces the incidence of contact dermatitis and severe mechanical injury. Professionals never treat a natural nail client the same way they treat a hard gel client.
| Nail and Skin Profile | Primary Vulnerability | Modification Benefit |
|---|---|---|
| Thin, Brittle Natural Nails | Fragile eponychium prone to instantaneous tearing and bleeding. | Prevents deep abrasions, cuticle bleeding, and unnecessary physical trauma during delicate shaping. |
| Heavy Acrylic or Hard Gel Users | High-pressure, rapid filing damage from coarse grit levels. | Allows for aggressive, high-speed shaping of enhancements without shredding the adjacent skin sidewalls. |
| Natural Nail Care Purists | Micro-tears leading to chronic, painful hangnails over time. | Ensures incredibly smooth transitions, protecting the delicate stratum lucidum layer of the surrounding skin. |
- CND Shellac completely removes toxic plasticizers from their entire professional line
- Purell hand sanitizer daily application slowly dissolves expensive gel polish top coats
- Diluted tea tree oil entirely prevents lifting beneath heavy builder gels
- Standard rubbing alcohol strips sticky gel residue exactly like expensive salon cleansers
- Formaldehyde based nail strengtheners completely shatter dry peeling plates over time
The Science of Grit Dynamics and Friction Management
In the world of professional nail technology, grit is not just a texture; it is an exact, mathematical measurement of abrasive power. Studies confirm that the standard metric for abrasive tools dictates precisely how aggressively they interact with keratinized human tissue. A lower grit number indicates larger, sharper, and more deeply embedded granules. When dealing with fresh, unmodified emery boards, you are essentially wielding hundreds of micro-blades that require strict dosing protocols to remain entirely safe for human contact.
| Grit Rating Standard | Technical Mechanism of Action | Optimal Skin Dosing & Exposure Limits |
|---|---|---|
| 80 to 100 Grit (Coarse) | Deep keratin excavation and rapid artificial bulk reduction. | Strictly 0 seconds of direct skin contact. Artificial enhancement reduction only. |
| 150 to 180 Grit (Medium) | Moderate keratin smoothing, shaping, and length adjustment. | Maximum of 2 light, sweeping passes near lateral folds. Limit total exposure to 3 seconds per nail. |
| 240 to 600 Grit (Fine) | Micro-abrasion, natural nail sealing, and gentle surface buffing. | Safe for incidental epidermis contact. Can be applied safely with up to 1.5 pounds of continuous pressure. |
Armed with the deep scientific knowledge of abrasive mechanics and exact exposure limits, you are finally ready to execute the industry’s most closely guarded preparation technique.
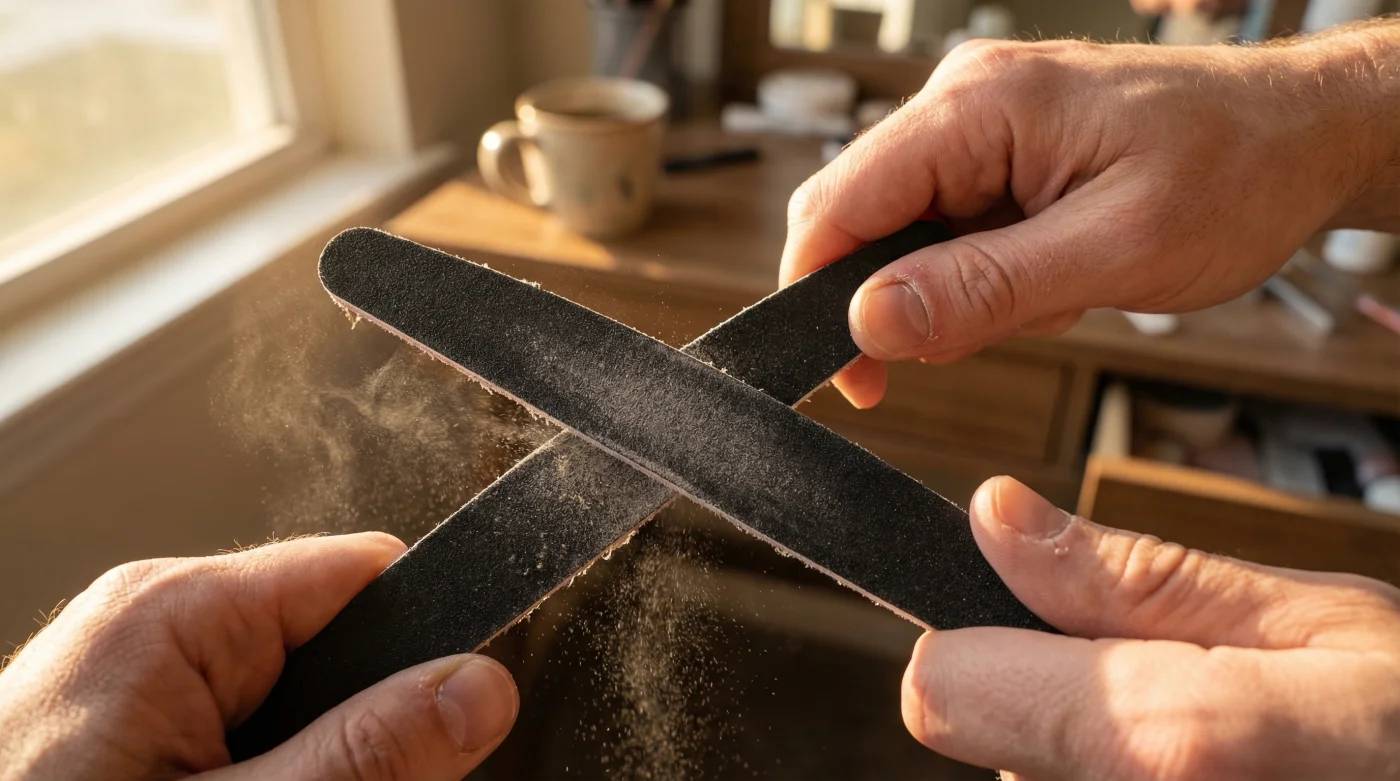
The Professional Secret: The Scoring Protocol
The ultimate physical modification to prevent accidental sidewall skin tearing is a mandated salon procedure known colloquially as scoring or seasoning the file. You must intentionally rub two new files together to physically crush and dull the sharp, dangerous edges before they ever touch human skin. This simple, rapid act of friction neutralizes the die-cut hazard instantly. To perform this correctly, you must follow a strict, step-by-step dosing and angle protocol to ensure you do not accidentally ruin the primary flat filing surface that you actually need for your nails.
Executing the Perfect Seasoning Technique
Begin by ensuring your hands are washed in warm water (approximately 95 degrees Fahrenheit) for 60 seconds to soften the tissues and remove surface oils. Take your newly opened tool and hold it securely in your dominant hand. Take an older, discarded file (or a second brand-new one) in your non-dominant hand. Align the abrasive flat surface of the second file directly against the sharp, 90-degree perimeter edge of the new file. Tilt the active tool to exactly a 45-degree angle. Apply precisely 2 pounds of downward pressure and forcefully drag the abrasive surfaces against each other along the entire perimeter. Execute exactly 3 to 5 continuous, rapid passes along all four sharp edges of the new file. This specific dosing of pressure and friction selectively crushes the dangerous, overhanging aluminum oxide crystals while leaving the primary flat surface of your emery boards perfectly pristine and ready for use.
However, even the most meticulously scored and prepped tool will ultimately fail your hands if you start with an inferior, mass-produced product.
The Quality Guide: Sourcing the Best Equipment
Selecting the right baseline tool determines the long-term structural health of your entire nail matrix. The global market is absolutely flooded with cheap, unregulated bulk packs that prioritize sheer quantity over structural integrity and user safety. Experts advise that visually inspecting the inner core materials and the bonding agents used in your abrasive tools is just as vital as mastering the scoring technique itself.
| Tool Component | The Elite Standard (What to Look For) | The Danger Red Flag (What to Avoid) |
|---|---|---|
| Inner Core Material | Flexible Mylar, high-impact polystyrene, or reinforced foam centers. | Rigid, brittle, low-grade cardboard that snaps or bends under 3 pounds of pressure. |
| Abrasive Application | Uniform, electro-coated aluminum oxide or premium silicon carbide coating. | Clumped, uneven sand deposits that leave visible, shiny bald spots on the paper. |
| Factory Edge Cut | Pre-beveled or buffered factory edges directly from the premium manufacturer. | Sharp, 90-degree die-cut raw edges with visible, hard glue seepage on the exact sides. |
Mastering this single preparation ritual and sourcing the correct base materials ensures that every future shaping session actively enhances your cosmetic beauty rather than compromising your foundational dermal health.
Sustaining a Lifetime of Flawless Manicures
The journey to perfect at-home nail care is paved with small, deliberate habits that compound significantly over time. By entirely rejecting the dangerous assumption that beauty tools are perfectly safe straight out of the cheap plastic packaging, you successfully elevate your routine to a clinical, professional standard. Every time you open a fresh pack of files, let the quick, rhythmic sound of scoring the edges serve as your mandatory, non-negotiable warm-up ritual. Your stratum corneum will remain perfectly intact, your sidewalls will be completely free of painful lacerations, and your hands will finally reflect the meticulous, pain-free care they truly deserve. This invisible physical modification is the ultimate, undeniable bridge between amateur mistakes and elite, long-lasting aesthetic perfection.