You have likely watched hundreds of viral clips where a technician effortlessly rubs a silicone tool over a nail, instantly transforming it into liquid mercury. Yet, when you attempt the same procedure at your station or vanity, the result is disheartening. Instead of a seamless, high-gloss mirror finish, you are left with a grainy, sparkly texture that looks more like fine glitter than melted metal. You change the powder brand; you switch silicone applicators; you even upgrade your lamp. But the grain remains.
The failure point is almost never the product itself, but rather a hidden variable in the chemical process that most tutorials gloss over: thermodynamics. Achieving true specular reflection—the physics term for a mirror-like surface—requires manipulating the topcoat while it is in a very specific state of polymerization. There is a critical five-second window where the topcoat is chemically receptive to the chrome powder in a way that allows the particles to lay perfectly flat. If you miss this thermal window, no amount of buffing will fix the finish.
The Physics of the "Warm" Application
To understand why the temperature of the topcoat is the non-negotiable factor, we must look at how gel polish cures. When UV or LED light hits the photoinitiators in a no-wipe topcoat, it triggers an exothermic reaction—it generates heat as the oligomers link together to form hard polymer chains. During this rapid hardening process, the surface of the gel transitions from a liquid to a solid.
However, immediately after the lamp turns off, the gel is still settling at a molecular level. It is technically cured (dry), but the polymer grid is slightly expanded due to the residual heat. This is the "Warm Zone." When you apply chrome powder to a warm topcoat, the microscopic pigment spheres are pressed into the slightly expanded surface rather than sitting on top of a cold, hard surface. This creates a bonded, seamless layer that reflects light uniformly rather than scattering it.
The Surface State Comparison
Understanding the difference between a cold application and a warm application is critical for consistent results. Use the table below to identify where your current technique falls.
| Application State | The Physical Mechanism | Visual Result |
|---|---|---|
| Too Hot (Under-cured) | The gel is still semi-liquid. The powder sinks deeply into the matrix, drowning the metallic pigment. | Dull, muddy gray appearance. The nail may ripple or dent. |
| The Warm Zone (Ideal) | The surface is cured but the polymer grid is expanded and slightly "tacky" from heat. | True Mirror Finish. Seamless, liquid-metal look with zero grain. |
| Too Cold (Fully Set) | The polymer grid has tightened and hardened completely. Powder sits loosely on top. | Sparkly, grainy, or "glittery." The chrome rubs off easily. |
- CND Shellac completely removes toxic plasticizers from their entire professional line
- Purell hand sanitizer daily application slowly dissolves expensive gel polish top coats
- Diluted tea tree oil entirely prevents lifting beneath heavy builder gels
- Standard rubbing alcohol strips sticky gel residue exactly like expensive salon cleansers
- Formaldehyde based nail strengtheners completely shatter dry peeling plates over time
Exact Dosing: The "Flash Cure" Protocol
The term "cure" is often misleading in the context of chrome application. While a standard topcoat requires 60 seconds to fully harden for wear, a chrome base requires a modified timeline to remain receptive. This is arguably the most guarded secret in high-end nail artistry. If you cure for the full duration recommended on the bottle, you have likely already missed the thermal window.
You must adjust your curing time based on the wattage of your lamp. High-wattage professional lamps cure faster, meaning the window to apply the powder is shorter. Conversely, lower-wattage home lamps require more time to reach that critical temperature. Experts advise creating a "test stick" to calibrate your specific equipment, but the following guidelines serve as a universal baseline.
Lamp Wattage & Curing Correlation
| Lamp Type / Wattage | Recommended Cure Time | The "Rush" Window |
|---|---|---|
| Professional LED (48W+) | 25 – 30 Seconds | Apply within 3 seconds of light turning off. |
| Standard UV/LED (36W) | 30 – 40 Seconds | Apply within 5 seconds of light turning off. |
| Compact/Travel Lamp (<24W) | 50 – 60 Seconds | Apply immediately (0-2 seconds). |
Once you have dialed in the curing time, the physical application technique must be executed with surgical precision to ensure the powder aligns correctly.
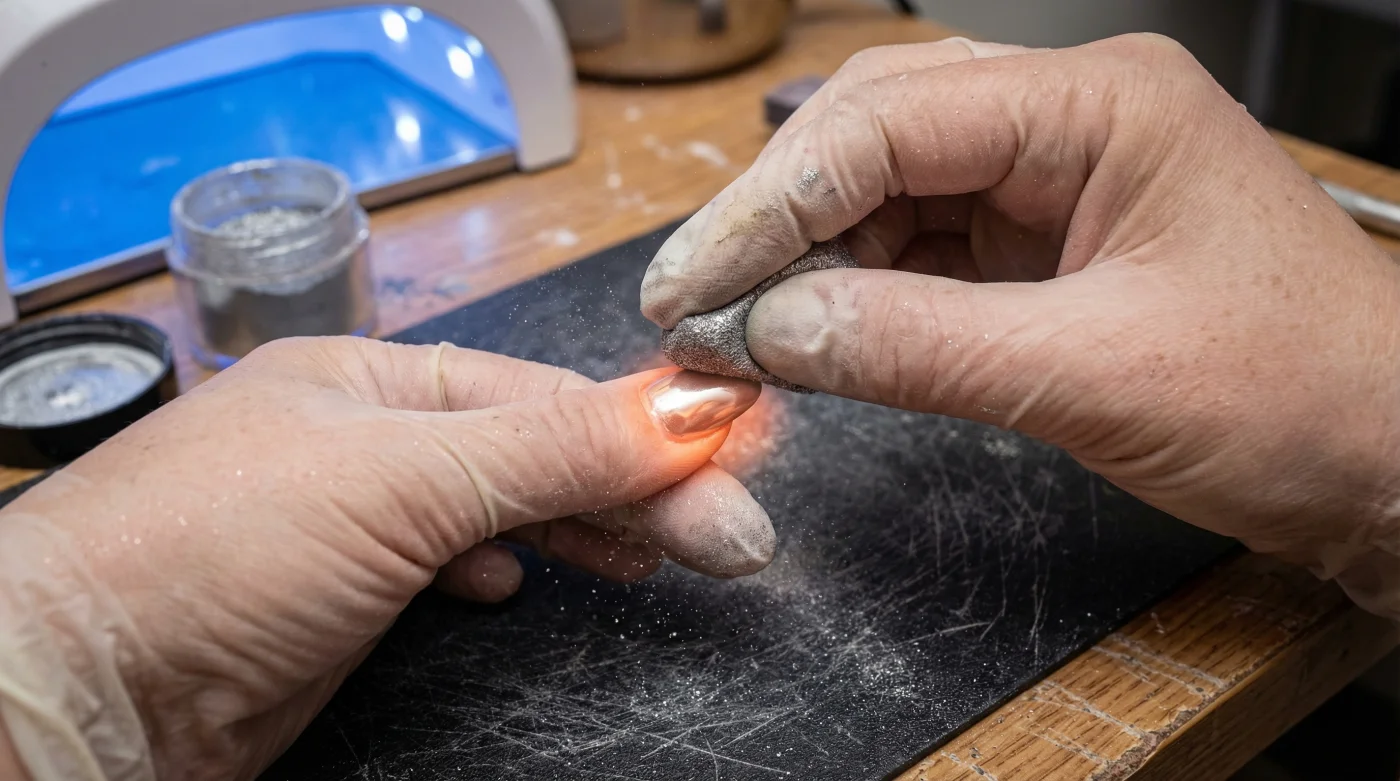
The Application Technique: Rub, Don’t Dust
The method of delivery is just as important as the timing. Many beginners use a fluffy brush to dust the powder onto the nail, similar to applying eyeshadow. This is chemically incorrect for chrome powder. Because the goal is to flatten the pigment onto a warm polymer chain, you require friction and pressure.
Using a dense silicone tool or a high-density sponge applicator, you must pick up a small amount of powder and apply it immediately as the hand exits the lamp. Use firm, circular motions. You are effectively "buffing" the powder into the warm topcoat. The heat from the friction of rubbing combined with the residual heat of the lamp creates the seamless bond. You will see the transition happen instantly: the powder will go from cloudy to a high-shine specular surface.
Diagnostic Troubleshooting Guide
Even with the correct timing, environmental factors can disrupt the process. Use this diagnostic table to troubleshoot persistent issues.
| Symptom | Root Cause | Immediate Solution |
|---|---|---|
| Chrome looks "satiny" or blurry | Topcoat was too hot or under-cured. | Increase cure time by 5-10 seconds. Clean and restart. |
| Chrome chips at the free edge | Failure to cap the edge with final topcoat. | File the free edge gently after chrome app, then seal with two thin layers of topcoat. |
| Visible brush strokes | Topcoat was not self-leveled before curing. | Flip the hand palm-up for 10 seconds prior to curing to let gravity level the gel. |
| Sparkly/Glitter Effect | Topcoat cooled down too much (Thermal Window Closed). | Decrease cure time or work faster. Only cure 1-2 nails at a time. |
Mastering the thermal window transforms chrome from a hit-or-miss experiment into a reliable, high-ticket service that guarantees flawless results every time.