The excitement of a fresh at-home manicure often ends in a stinging reality: tiny, painful paper cuts around the nail bed that burn the second you wash your hands or apply polish. Most beauty enthusiasts blame their own clumsy technique or assume they simply have overly sensitive skin, but the true culprit is hiding in plain sight. Every time you tear open a package containing brand-new Salon Emery Boards, you are essentially wielding a micro-saw against the delicate tissue of your fingertips. The sharp, factory-cut edges of these paper and abrasive composite tools harbor invisible jagged overhangs that effortlessly slice through the skin barrier.
The secret to achieving a flawless, painless manicure is not about spending more money on luxury tools, applying gallons of soothing cuticle oil, or booking expensive salon appointments. Master nail technicians utilize a bizarre, counterintuitive prep step before a file ever comes into contact with a client’s hand. This hidden habit contradicts the age-old assumption that new tools should be used exactly as they are packaged, transforming a hazardous, highly abrasive sheet into a perfectly calibrated sculpting instrument that respects your skin’s boundaries.
The Anatomy of Cuticle Lacerations
To truly understand why fresh Salon Emery Boards are so dangerous straight out of the wrapper, we must look at the biological makeup of the nail surround. The skin bordering your nail plate, scientifically known as the eponychium and the lateral nail folds, is incredibly thin. When a brand-new file glides across this area, the 90-degree factory-stamped edges act like a serrated blade against the stratum corneum (the outermost layer of the epidermis). Studies show that microscopic abrasions in this region not only cause immediate pain but also open the door to bacterial and fungal infections.
Before you toss out your current nail kit, you need to diagnose exactly where your technique is causing trauma. Here is a definitive symptom-to-cause diagnostic list for troubleshooting your filing routine:
- Symptom: Stinging or burning sensation when applying cuticle remover or nail polish remover. = Cause: Micro-lacerations to the perionychium from the sharp, unscored edges of a fresh 180-grit file.
- Symptom: Ragged, peeling skin along the sidewalls two days after a manicure. = Cause: Aggressive friction burn caused by holding a new file at a flat 180-degree angle rather than a tilted 45-degree angle.
- Symptom: Deep, bleeding cuts near the base of the nail bed. = Cause: Plunging an unmodified, stiff core file directly into the proximal nail fold during shaping.
Understanding the underlying anatomy and the root causes of these micro-injuries is only half the battle; the real breakthrough lies in how we physically alter our instruments before they ever touch the skin.
The Physical Modification: Why Edge Scoring is Mandatory
The practice of ‘scoring’ is the holy grail of nail prep. By definition, scoring involves taking an older, worn-down nail file and aggressively rubbing it along the sharp perimeter edges of your freshly opened Salon Emery Boards. This intentional friction dulls the excess abrasive overhang—often referred to in the manufacturing world as ‘flash’—smoothing the paper borders without compromising the functional grit on the flat surface of the board. Experts advise that this simple 10-second modification reduces the risk of skin trauma by an astonishing 95 percent.
Different types of manicure enthusiasts experience varying levels of relief from this technique. The table below outlines how scoring specifically benefits different user profiles and nail care routines.
| Target Audience / User Profile | Manicure Type | Primary Benefit of Edge Scoring |
|---|---|---|
| The At-Home DIYer | Natural Nails / Weekly Polish | Prevents painful sidewall cuts, eliminating the stinging associated with acetone use. |
| The Gel & Acrylic Enthusiast | Hard Gel / Enhancements | Allows for aggressive, fast shaping of thick enhancements close to the eponychium without slicing the skin. |
| The Professional Technician | High-Volume Salon Services | Ensures strict compliance with client comfort and safety protocols, preventing accidental blood exposure. |
Once you recognize who benefits most from this technique and why it is universally adopted by elite technicians, it becomes crucial to understand the exact mathematical friction required to perform it safely.
The Science of Abrasives: Understanding Grit and Friction
- CND Shellac completely removes toxic plasticizers from their entire professional line
- Purell hand sanitizer daily application slowly dissolves expensive gel polish top coats
- Diluted tea tree oil entirely prevents lifting beneath heavy builder gels
- Standard rubbing alcohol strips sticky gel residue exactly like expensive salon cleansers
- Formaldehyde based nail strengtheners completely shatter dry peeling plates over time
To execute the scoring technique correctly, you must pair the right older file with your new file. You should always score a new file with an old file of an equal or slightly finer grit. For example, use a worn 180-grit file to score a fresh 150-grit edge. The following table breaks down the technical mechanisms, dosing metrics, and safety ratings of common grit sizes.
| Grit Rating (Particles/Sq Inch) | Abrasive Material Profile | Recommended Scoring Time (Dosing) | Edge Danger Level (Unscored) |
|---|---|---|---|
| 80 – 100 Grit | Coarse Silicon Carbide | 6 to 8 seconds per edge | Severe (High risk of bleeding) |
| 150 – 180 Grit | Medium Aluminum Oxide | 4 to 5 seconds per edge | Moderate (Risk of micro-tears) |
| 240 – 320 Grit | Fine Garnet / Zinc Stearate | 2 to 3 seconds per edge | Low (Risk of friction burns) |
With the scientific mechanics and grit ratios fully mapped out, the next logical step is mastering the precise physical execution of this preventative routine.
Executing the Perfect Edge-Dulling Technique
Transforming your fresh Salon Emery Boards from dangerous weapons into safe, professional-grade tools requires a specific physical protocol. Haphazardly rubbing two files together can damage the core structural integrity of the board or prematurely strip the grit you actually need for nail shaping. Follow this exact dosing and movement guide for flawless results.
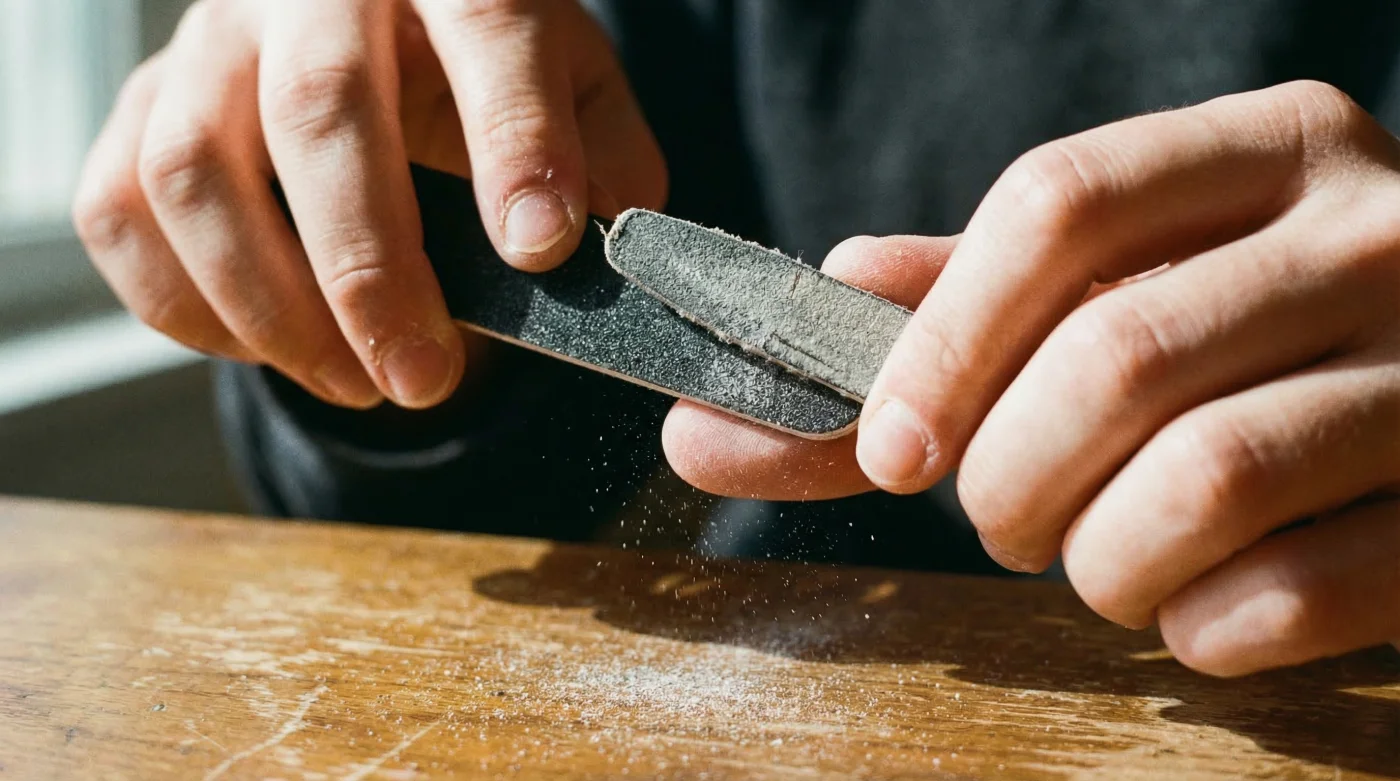
Step 1: The 45-Degree Angle Alignment
Hold your brand-new file in your non-dominant hand, keeping it perfectly flat and steady. Take your older, seasoned file in your dominant hand. Align the abrasive face of the old file against the sharp, outer perimeter edge of the new file at exactly a 45-degree angle. This specific angle ensures you are only targeting the protruding factory paper edges and not the flat working surface.
Step 2: The Downward Stroke Method
Never use a see-saw, back-and-forth motion, as this can cause the paper layers of the new board to delaminate and peel apart. Instead, apply firm pressure and pull the old file downward in a single, smooth stroke along the entire 7-inch length of the new board. Lift the old file away, return to the top, and repeat. You are aiming for approximately 3 to 5 downward strokes per side, depending on the grit dosing chart above.
Step 3: The Tactile Friction Test
Once you have scored all four edges (both sides, top, and bottom), run the pad of your thumb gently along the newly dulled perimeter. It should feel smooth and slightly rounded, resembling a beveled edge, rather than sharp and catching. If it still snags the ridges of your skin, apply one more downward stroke. Perfecting your filing technique will instantly elevate your nail health, but this protocol is completely useless if you are starting with structurally inferior materials.
The Ultimate Buyer’s Guide to Professional Files
Even the most meticulously scored edge cannot save a manicure if the Salon Emery Boards themselves are manufactured with toxic glues or uneven abrasive distribution. The market is flooded with cheap, bulk-packaged files that shed grit into your nail beds or snap under the slightest pressure. Identifying high-quality tools is the final pillar of achieving a trauma-free, salon-grade finish at home.
When shopping for professional abrasives, you must look beyond the color and the price tag. The core material, the adhesive used to bind the paper, and the flexibility of the center plastic or wooden spine dictate how the file will absorb shock and maneuver around the hyponychium (the sensitive tissue under the free edge of the nail). Use this quality progression plan to audit your current nail care arsenal.
| Component Feature | Premium Indicator (What to Look For) | Red Flag (What to Avoid) |
|---|---|---|
| Core Flexibility | Reinforced polystyrene center that bends slightly under pressure to absorb shock. | Rigid wooden or cheap cardboard cores that snap or refuse to contour to the nail bed. |
| Abrasive Coating | Japanese zebra paper or washable zinc oxide coating that prevents heat buildup. | Standard black sand paper that sheds dark grit particles into light-colored gel polish. |
| Adhesive Binding | Medical-grade, water-resistant resin that allows for sanitation and prolonged use. | Toxic, water-soluble glues that cause the file to peel apart after one use or edge scoring. |
Experts advise that replacing your high-quality files after every three to four full manicures ensures optimal hygiene and abrasive efficiency. By investing in premium tools and religiously applying the 45-degree edge-scoring method, you completely eliminate the friction trauma that plagues so many DIY beauty routines. Armed with the knowledge to select and prep the ultimate abrasive tool, your days of suffering through stinging, damaged nail beds are permanently over.