Picture this: You have spent weeks enjoying a flawless gel manicure, but now the edges are lifting and catching on your hair. You grab your cotton balls, a bottle of harsh solvent, and start tearing off sheets from the kitchen roll, expecting a seamless removal just like the viral tutorials promise. Yet, twenty minutes later, you are left with agonizing, stinging fingertips, chalk-white, parched skin, and stubborn polish that simply refuses to budge.
This universal frustration is often blamed on cheap polish, cold room temperatures, or simple impatience, but dermatologists and elite nail technicians know the real culprit. There is a critical, hidden step missing from almost every online DIY tutorial—a microscopic seal of protection that dictates whether the solvent aggressively destroys your skin barrier or effectively melts away the stubborn polymers. If you skip this one vital layer, your at-home salon experience is guaranteed to end in painful failure and damaged nail beds.
The Chemistry of Solvent Evaporation and Tissue Damage
To understand why traditional Aluminum foil wraps fail so spectacularly on their own, we have to look at the behavior of the primary solvent involved. Pure acetone, scientifically known as dimethyl ketone, is a highly volatile chemical. Its primary function is to break down the complex polymer chains found in gel polish, acrylics, and dip powders. However, it does not discriminate between synthetic nail polymers and the natural lipid bilayer of your skin’s stratum corneum.
When you place an acetone-soaked cotton pad directly onto the nail and wrap it in foil without any protective boundary, the solvent instantly begins to wick down into the surrounding cuticle tissue. Because the body radiates heat (averaging 98.6 degrees Fahrenheit), the trapped acetone vaporizes rapidly within the foil chamber. This aggressive vaporization strips the skin of its natural oils in minutes, leading to severe dehydration, micro-fissures, and chemical burns.
Vaporization and Skin Barrier Breakdown
| Solvent Phase | Temperature / Time Trigger | Technical Mechanism | Impact on Unprotected Skin |
|---|---|---|---|
| Liquid Application | Room Temp (72 Fahrenheit) | Direct contact with keratin and lipids | Initial stripping of surface sebum |
| Vaporization | Body Temp (98.6 Fahrenheit) | Dimethyl ketone transitions to gas within foil | Deep lipid extraction, rapid moisture loss |
| Crystallization | 10-15 Minutes Exposure | Polymer breakdown and solvent evaporation | Skin turns white, stratum corneum fractures |
Recognizing the brutal chemistry of unprotected solvent exposure is the first step in rethinking how we approach home manicures.
Who Needs This Protective Technique the Most?
Not all manicures are created equal, and neither is the level of solvent exposure required to remove them. Individuals who frequently opt for long-lasting nail enhancements are at an exponentially higher risk for chronic contact dermatitis and nail matrix damage if they continually skip the protective boundary.
| Target Audience / Nail Type | Removal Difficulty | Benefits of Using a Barrier Cream Protocol |
|---|---|---|
| UV Gel Polish Users | Moderate (10-15 mins) | Prevents the stinging sensation and cuticle peeling often associated with bi-weekly gel removal. |
| Acrylic Enhancements | High (20-30 mins) | Protects against extended chemical exposure; stops the surrounding skin from absorbing the solvent. |
| Dip Powder (SNS) Devotees | Severe (25-35 mins) | Maintains skin elasticity despite the extreme dehydration caused by cyanoacrylate breakdown. |
- CND Shellac completely removes toxic plasticizers from their entire professional line
- Purell hand sanitizer daily application slowly dissolves expensive gel polish top coats
- Diluted tea tree oil entirely prevents lifting beneath heavy builder gels
- Standard rubbing alcohol strips sticky gel residue exactly like expensive salon cleansers
- Formaldehyde based nail strengtheners completely shatter dry peeling plates over time
Diagnostic Guide: When Your Nail Removal Goes Wrong
Experts advise that healthy nail removal should never involve pain. If you experience discomfort, your technique is inherently flawed. Below is a diagnostic symptom checklist to help you troubleshoot your Aluminum foil wraps method.
- Symptom: Intense burning or stinging under the foil. = Cause: Acetone has breached the micro-cuts in your cuticles due to a lack of an occlusive barrier.
- Symptom: Chalky, bright white skin around the fingertips. = Cause: Complete lipid extraction. The solvent has dissolved your natural skin oils, severely dehydrating the epidermis.
- Symptom: Polish remains gummy but will not scrape off. = Cause: The solvent evaporated into the skin rather than staying concentrated on the nail plate, often due to a loose foil seal and no cream to block capillary action.
- Symptom: Hangnails developing 24 to 48 hours post-removal. = Cause: Chemical trauma to the eponychium (the living tissue at the base of the nail) causing the skin to die and peel.
Once you understand the severe symptoms of solvent damage and why traditional methods fail, the solution becomes incredibly clear and entirely preventable.
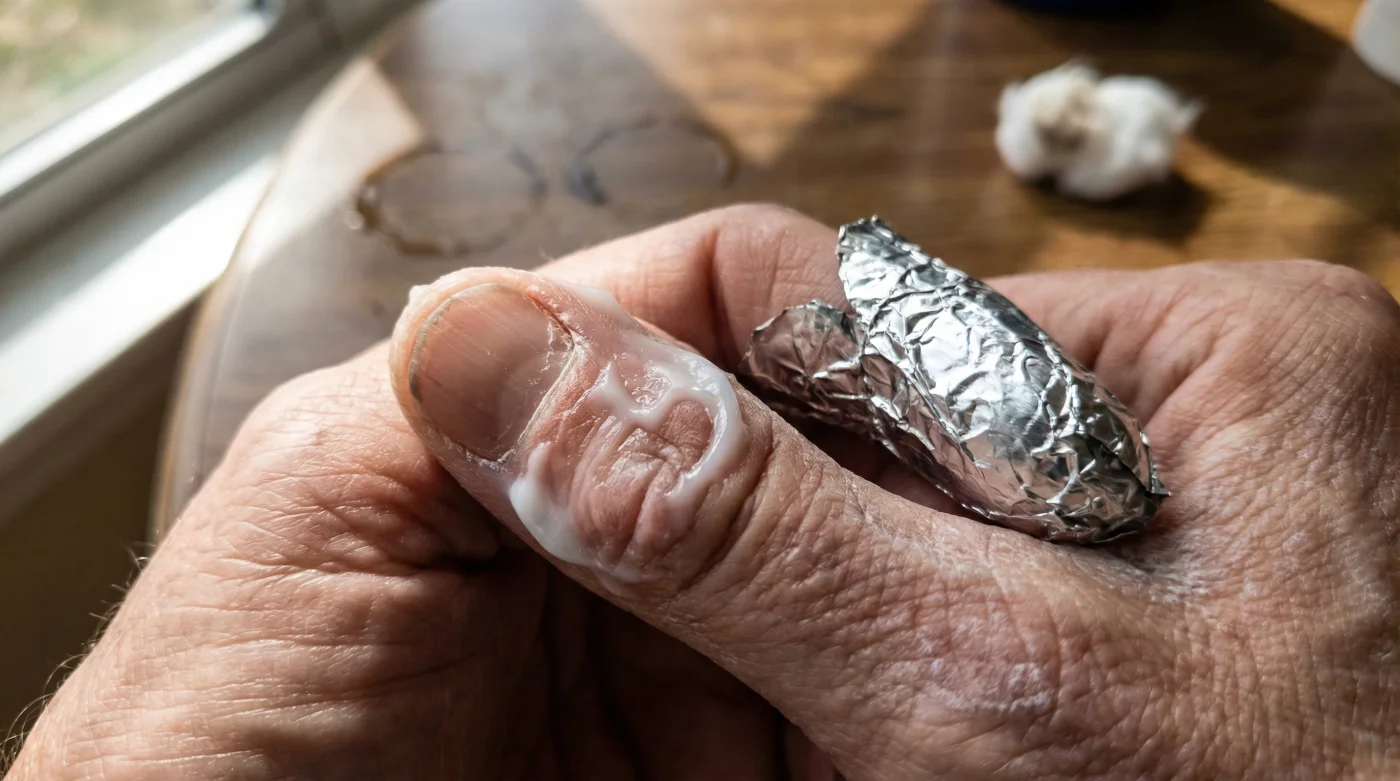
The Missing Link: The Thick Barrier Cream Protocol
The secret that elite nail technicians utilize to ensure safe, effective removal is the application of a thick, occlusive barrier cream. By applying a heavy layer of petroleum jelly, thick ceramide ointment, or a specialized cuticle mask directly to the skin surrounding the nail plate, you create an impenetrable fortress. Because water and lipids repel the solvent, the barrier cream forces the acetone to stay exactly where it belongs: strictly on the nail polish.
Studies confirm that occlusive agents prevent trans-epidermal water loss and block the lateral wicking of harsh chemicals. When you apply approximately 1/4 teaspoon (or about 1.25 grams) of barrier cream to the perimeter of each nail before applying the Aluminum foil wraps, the solvent cannot evaporate into the skin tissue. It is trapped against the hard polymer, accelerating the breakdown of the polish while leaving your skin completely untouched and heavily moisturized.
Selecting the Perfect Defensive Layer
| Product Category | What to Look For (Quality Indicators) | What to Avoid (Failure Points) |
|---|---|---|
| Petroleum Jellies | 100% pure white petrolatum, hypoallergenic, thick consistency. | Water-based lotions, thin serums that evaporate under heat. |
| Ceramide Creams | High lipid content, cholesterol, fatty acids, ointment texture. | Alcohols, fragrances, or lightweight gel moisturizers. |
| Cuticle Balms | Beeswax base, shea butter, lanolin, thick paste format. | Thin cuticle oils (they will simply mix with the solvent and fail to block it). |
Perfecting this protective method not only saves your skin from agonizing chemical burns but completely revolutionizes the speed and efficiency of your polish removal.
Step-by-Step Execution for Flawless Aluminum Foil Wraps
To execute this professional-grade protocol at home, precision is key. Do not rush the preparation phase. Gather your supplies: 100% pure acetone, high-quality cotton pads, heavy-duty kitchen foil cut into 3-inch by 3-inch squares, a wooden cuticle pusher, and your chosen thick barrier cream.
The Top 3 Steps for Perfect Execution
- Step 1: The Mechanical Prep. Gently file the shiny top coat off your manicure using a 180-grit file. This breaks the surface seal. Next, apply exactly 1/4 teaspoon of your thick barrier cream completely coating the cuticle, the sidewalls, and the fingertip directly below the nail. Do not get the cream on the nail plate itself, as it will block the solvent from working on the polish.
- Step 2: The Saturation and Seal. Saturate a piece of a cotton pad (cut to the exact size of your nail) with approximately 2 milliliters of pure acetone. Place it directly on the filed nail plate. Immediately wrap the finger tightly with the 3×3 inch foil square. Fold the top down to create a vacuum seal. The barrier cream will act like a gasket, sealing the edges.
- Step 3: The Incubation Period. Allow the wraps to process for exactly 15 to 20 minutes at a standard room temperature of 72 degrees Fahrenheit. If your hands are naturally cold, you can place a warm towel over them to encourage activation. After the time is up, pull the foil off with a firm twisting motion to reveal polish that crumbles away effortlessly.
Mastering this professional-grade protocol ensures your natural nails remain remarkably resilient, perfectly hydrated, and structurally sound, ready for their next brilliant masterpiece.